How to turn a WordPress website into a single website
WordPress Multisite has lot of plusses. It allows you to create any number of websites with one WordPress installation. It allows sharing links between these sites, data sharing, and users, and by selling sites on your network to users, it provides you with a way to make money by installing WordPress.
But sometimes, a single-site WordPress installation may be the best choice for your site. You may not want to share user databases with other websites. Your site may be much larger than other sites on the network, and you want to keep it separate. Either you want a different hosting environment for the site, or switch to your own settings from other people’s multilingual networks.
Another possibility is that you are running a small multi-site torrent, but now you want to delete all but one site and return it to a single site installation.
The good news is that you can convert a subsite from a multisite WordPress to a single website, or the web to a single website. The bad news is that this is more complicated than migrating the site to another WordPress installation or domain.
In this article, I will show you how to move your WordPress site from WordPress Multisite to a single site without data loss.
contents
1. Why migrating from WordPress to a single website is more complicated than migrating to a single website
2. How to migrate subsites from WordPress Multisite to a single site
3. Migrate users from a multi-site WordPress site to a single site
4. Migrate your domain from a multilingual network to a new single website
5. How to turn an entire multilingual network into a website
Why migrating from WordPress multisite to a single website is more complicated than migrating to a single website
Let's see why migrating sites from a multi-site network is more complicated than migrating between single-site installations.
The reason for this is the way WordPress Multisite stores your data and files, and the fact that some data is stored along with data from other sites on the web.
The multi-site network stores the data on each site as follows:
Upload files for each site are stored in WordPress-content/upload/site/xx, where xx is the identifier of a single site.
Most of the data, including posts, post metadata, taxonomies, etc., are stored separately in specific database tables for each site, and these tables are created every time a new site is added to the network. Regardless of the identity of the site, these contents can be previewed, so wp_12_posts will be the 12th post table of the site.
The user data of the entire network is stored in two tables. Instead of becoming a user of a certain site, users have an account on the network that stores metadata about the sites they have access to. This means that you cannot delete user database tables and redirect them to your new site: you must migrate users separately.
The theme and attachment files are stored once in the network, without activation on multiple sites. This is one of the main benefits of Multisite, because it means you only need to update themes and plugins once. However, when you remove the website from the web, things get complicated.
When we complete the process of migrating from WordPress Multisite to a single website in this article, I will show you how to handle each part of the site so that you can successfully migrate it.
A note on terminology: In this article, I refer to sites in a multi-site network as "subsites." I will use "basic site" to refer to the basic site in the network, which existed before Multisite was activated. I will refer to the standalone site as a "single site" in my custom WordPress installation.
Go back to the basics by switching from WordPress multi-site to single-site installation.
How to migrate a subsite from a WordPress multisite to a single site
So, assuming you’re not afraid of what you’ve learned so far about the process, let’s take a look at the different ways you can do this.
The options are:
1. Use the free export/import plug-in to transfer data and manually transfer files.
2. Use the migration plugin to extract all data and files.
3. Perform a manual migration.
Let's review each of these methods in order.
1. Use free plugins to migrate subsites from multiple WordPress networks to a single website
The first option uses a free import/export plugin to use your content and another free plugin to transfer widget settings.
The advantage of this method is that it is free and does not require any conversion of the database, so it is very unreasonable. However, it has some disadvantages:
• Only the migrated user is the user who created the content-you will manually migrate all other users.
• Except for widget settings, no settings can be transferred. If you have complex settings and plugins like e-commerce plugins, this method is not recommended because you will spend a lot of time manually copying all settings.
But if your website is relatively simple, with few plugins, not very rich in customization, and not many users, this may be the easiest way to maintain.
So let us see how you did it. There are six steps:
1. Create a new single site installation.
2. Install the same plugins and themes as the old site and enable them.
3. Use the import/export plug-in to convert the content.
4. Use widget import/export plugin to use widget settings.
5. Use the Import and Export User plugin to add other users who are not content authors.
6. Manually copy the settings of the old site to the new site.
They are very fast, but some of them are fast or automatic.
Create a new single site setup
First install WordPress on your new website. When you create a site, you will get a temporary domain name because you still don't want to use the domain name of the old site-it will be stored as long as your site is running.
Install WordPress using the installer or manual installer.
Install accessories and themes
Now you need to install the plugins and themes you used on the old site in the multisite network of the new site. It is important to do this before migrating content, because plugins and themes may create content types (such as post types) that you need to migrate.
Open each plugin and theme screen in the WordPress dashboard from an old website in a multisite network and check which ones are active. If the plugins and themes come from the WordPress plugins and themes folder, you can install and activate them normally in the new website.
If these are premium items and you do not have a license, you will need to purchase one. Download themes/plugins from the server and install them according to their instructions.
Before proceeding, make sure that all the same plugins and the same themes are enabled on the new site. Don't worry about setting them, and don't mess up the wizard-we will set them up after adding content.
Use import/export plugins to migrate content
Now it's time to remove the content from the old website and place it on the new website.
On the old site, install the import/export plugin. You need to perform this operation through the network administrator screen, or ask the network administrator to perform this operation for you.
After installing and activating the plugin for your site, go to "Tools"> "Export".
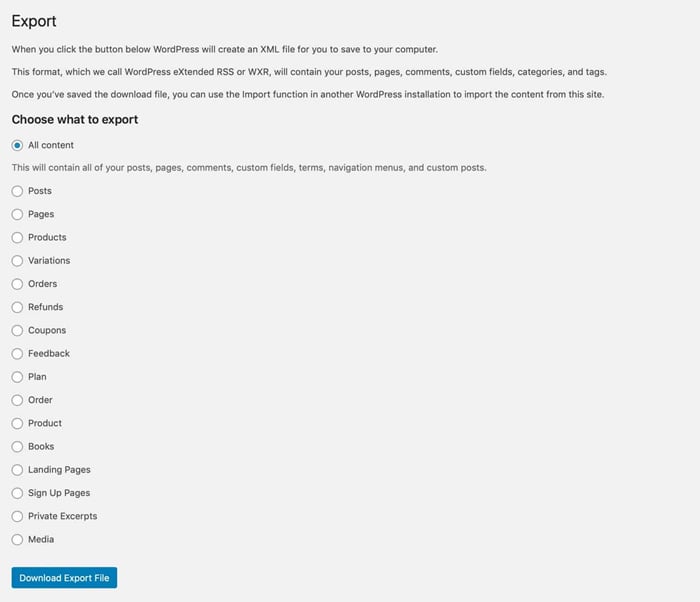
WordPress export screen
Under Choose what to export, select all the content, and then click the Download Export File button.
This will download the XML file to your computer, which will be named after your website. Keep it in a safe place-you need to move it to a new site.
Now open your new website and go to "Tools"> "Import".
If you have not installed the import plugin, you need to click the Install Now link under WordPress.
Import screen-install WordPress installer
The importer plugin will be installed and activated, and a link will appear at the top of the screen for you to run the importer.
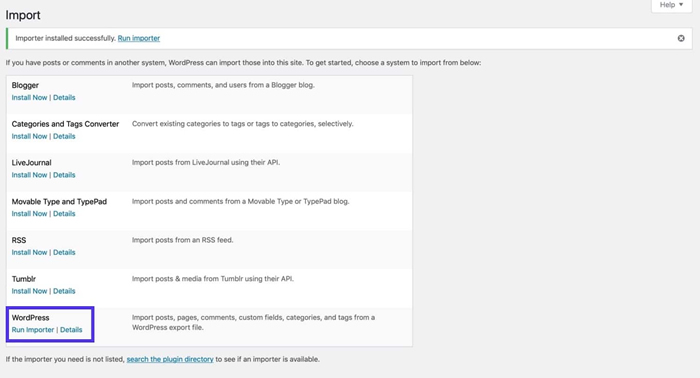
Start importer
Click the link and you will be taken to the screen to upload the XML file.

Upload import file
Click the "Choose File" button, find the XML file on your computer, and then click the "File Upload and Import" button.
WordPress will ask you to identify the author and decide if you want to download the plugin.
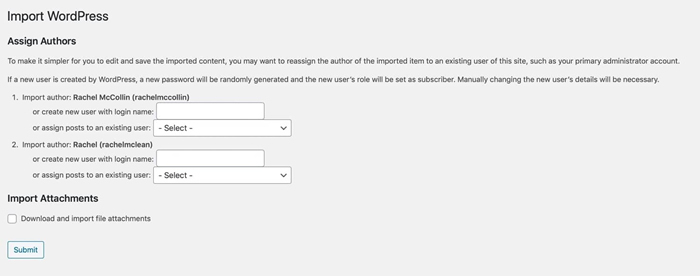
Import options
Select the authors on the new site that are related to the authors of the old site (if you have added them to the site). If not, please enter your login name and the importer will add a new user account for you. Then download the accessory box and import it.
Click the submit button and the importer will send you the contents of the XML file. Go to your message screen and you will be able to see all the messages listed.
Use the widget import/export plugin to transfer widget settings.
Therefore, you have now imported all posts, pages, etc.
You can’t delete most settings-but you can use the Widget Importer & Exporter plugin to import widget settings.
Install and enable plugins on both sites-again, you can only do this if you have permission to install plugins on the network.
Now on the original site (in multisite), go to Tools> Widget Importer and Exporter.
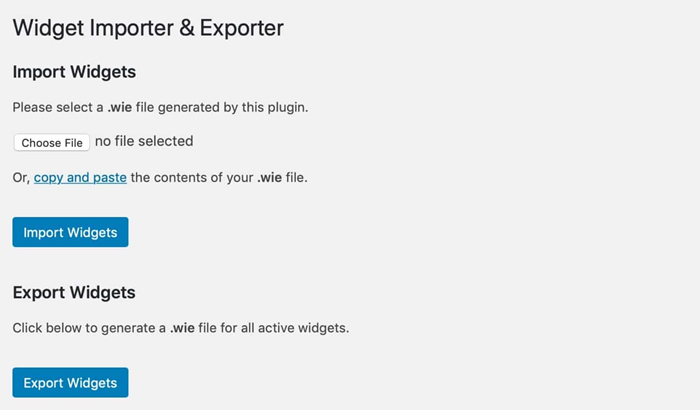
Small parts importers and exporters
Click the Export widget button. This will download the .wie file to your computer-save it in a safe place.
Now on the new website, go to "Tools"> "Extractor and Exporter Widgets". Click the "Choose File" button and upload the file you just downloaded, then click the "Import Widget" button. You will see a screen showing which widgets have been imported.
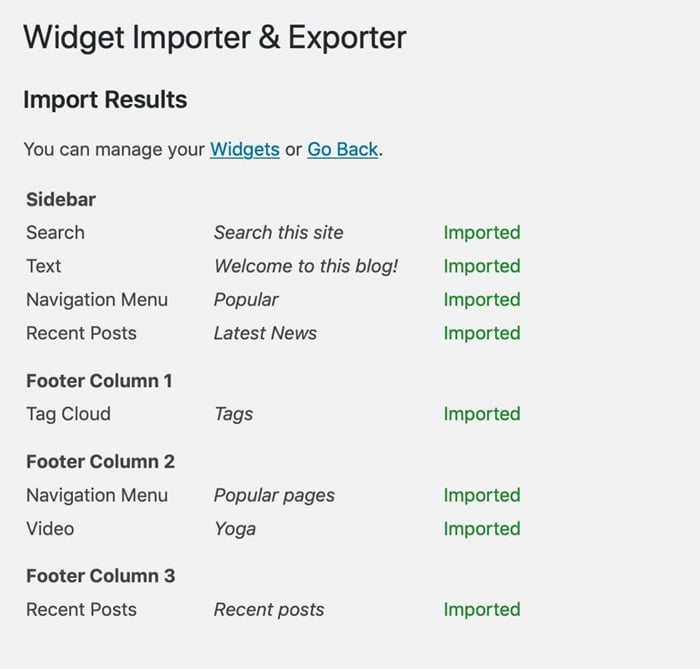
Imported widgets
The next step is to enter the users that were not created when you imported the content. If you migrate to your website, this is one step of all the rules you need to follow, so it is brought to the end of this article-go to the "Import Users" section.
Finally, you need to update the settings on the new site.
Manually copy the settings of the old subsite to the new single site.
The next step is to update the settings on the new site to reflect the settings on the old site. This is an operation you will perform manually, so it can be a laborious process.
In a browser window, open the management screen of the old webpage and the new webpage in another window-or better yet, use a different browser to mix at least two. Be careful on the settings screen and change the settings on the new site to reflect the settings on the old site.
After this is done, your new website will be up and running. The last step is to update the domain name-this is the same for all methods and is covered in the section on relocating domain names.
2. Use the migration plugin to migrate subsites from WordPress multisite to a single site
If you have access to the migration plug-in on a web-based network, then using it for migration will be easier and more reliable than using the import/export plug-in. This also means that you do not need to access the database directly, so if you are not used to manual migration, it is safer than manual migration.
First implement the migration from the old site. You need to use a migration plugin that is compatible with WordPress Multisite, and only the site will be migrated, not the entire network.
At Atakdomain, we provide a free Migrate Guru app for great websites. However, this plugin will not prevent you from migrating a single site from a multi-site torrent. There are no free plugins to do this, so you need to use premium plugins.
Most migration plug-ins, even advanced plug-ins, do not support sub-site migration from the network.
Two good choices are Duplicator Pro and the all-in-one WP migration plugin, which can transfer your files and databases to your server.
In order to run the automatic migration, you need to purchase and install the Duplicator Pro plug-in online and on the new website. Complete migration via attachment: You need to create a package by migrating from the old site and then moving it to the new site.
Since user data is stored for the entire network, you need to separate it. I will hide it later in this article because it affects all forms of migration.
Manually move a subsite from a WordPress multisite to a single site
The last way to migrate a site from a WordPress multisite network to a single site is to transfer it manually. This is not good for you, but you should only do this if you feel you are visiting phpMyAdmin and modifying the database export file.
The site you download from Multisite will contain three parts, which you need to copy from the Multisite network:
• Theme files and attachments-you can copy or paste them back to the new site
• Upload-You will find these in the sub-site sub-page of the content / upload / wp site
• Database tables-you do not need all the database tables, but only the tables related to the site
Note: If your multisite network was created before WordPress 3.5, you will not have a webpage folder. Instead, you will have a blogs.dir folder in wp-content that contains all the downloadable files for the subsite. This will have a numbered folder for the site you are migrating to, and you will copy that folder instead.
Back up
Before migrating, it is best to back up the multi-site installation. Use your preferred backup plugin, or use your hosting agent to create backups-if your server allows-Atakdomain performs regular backups, you can also create backups manually.
You will use this backup to copy the relevant files to your new website, and it can also give you peace of mind if you encounter problems.
Find your subsite ID in a multisite network
Each site in the network has its own unique identification. It is used to identify its folder in the wp-content/uploads/sites directory and identify the database table of the site.
Go to Network Admin> Sites, and select the editing option for the site you want to migrate to.
Site screen in network manager
Obtaining your WordPress URL will provide you with the site identification. The format of the URL should be http://mynetwork.com/wp-admin/network/site-info.php?id=XX.
XX is the ID of your site, which will be the name of the folder containing its files, and the name of its database table.
Transfer theme and plugin files from WordPress multisite to a single website
Now determine the plugins used by the subsite and install them on the new WordPress site through the plugin screen, or download them from the default settings you downloaded from the old site. Copy them to wp-content / plugins on the new website.
You can find out which plugins are in use by going to the add-ons screen on the subsite. Open the plug-in that has not activated the network.
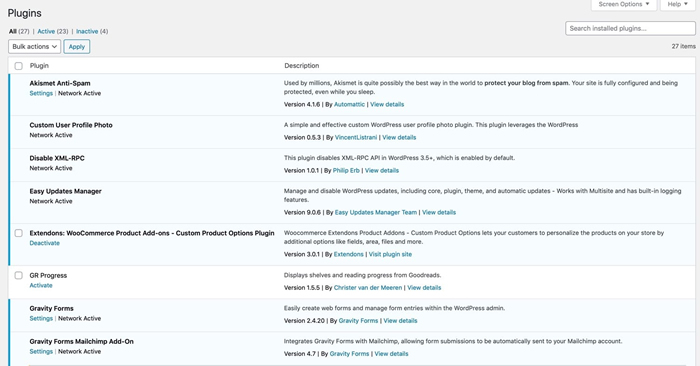
Expanded screen under multi-site network subsite
Do the same with your theme-copy it back to the wp-content / themes directory of the new single-site WordPress installation, or reinstall it.
Redirect downloads from multiple WordPress subsites to a single website
If the torrent was created after WordPress 3.5, it will have a web folder in wp-content / upload. Find the subfolder with the URL of the subsite and upload its content to the wp-content / uploads folder in the new site.
If the network is older and has a blogs.dir folder, it will also have a folder to identify your site. In it, you will find a subfolder named "files". Copy the contents of the folder to the wp-content / uploads folder on the new website.
Note: You may need to delete the folder created by WordPress in your newly uploaded folder to avoid conflicts.
Want to know how we increased traffic by 1000%?
Receive my weekly newsletter with over 20,000 people, which includes a built-in WordPress plugin!
Subscribe now
You have now installed all files. You don't need to enable it because the database transfer will copy all settings, including activation of plugins and themes and settings.
Delete the subsite table from the multilingual network
Since you are only moving the subsites and not the entire setup, you do not need the entire contents of the database.
Open phpMyAdmin for your multisite network. Click the "Export" tab.
Multi-site networks have many other tabs from a single site-additional settings for each site. View the table related to the site you posted. It will start with wp_XX_, which is the XX logo for your website.
Select all the tabs related to your child's site and go to the "Selected:" box.
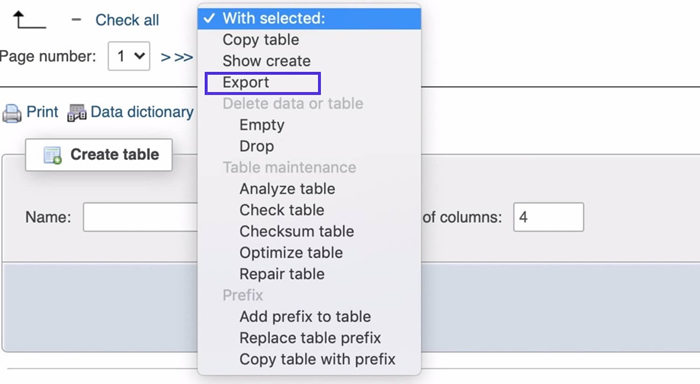
Select and extract database tables
Click it and select Export.
On the next screen, leave the export method as Quick and press the Go button.
Fast method
Modify the database table
Copy the SQL file that has been downloaded to your computer and give it a name that tells you what it is (for example, by adding a "copy" to its name). Open in the code editor.
You need to change two things: links and table references.
Start with the connection. You need to move all instances of the site domain to the multi-site network to its new single domain (or temporary domain if you are using one domain when running the new site). For example, if your site is at http://network.com/mysite, redirect it to http://mysite.com.
If your network uses subdomains, you will need to modify all examples on http://mysite.network.com. If you do, I suggest you also check the subdirectory version. Save your file.
Second, the database tables in the new single-site installation will not have site identifier prefixes, so you need to remove these prefixes. In your SQL file, convert all instances of wp_XX_ to wp_, which is the XX ID of your site.
Now save the SQL file.
Transfer database tables from subsites to multiple sites to a single site
Now that you have modified the SQL file, you need to import the database tables. First delete all existing tabs in the new WordPress installation.
Open phpMyAdmin for your new website. Select all tables except the wp_users and wp_usermeta tables from the new website database.
Selection box: buy, then discard. When prompted on the next screen, press Go.
Next you need to upload the database you edited:
1. Click the Import tab.
2. Click the Choose File button.
3. Select the SQL file you modified, and then select Select or OK.
4. Press the start button.
After some time (depending on the size of the database), you will see a message telling you that the upload has completed successfully. If your database is large, this may take some time.
Final steps
You are not finished yet. Next, clear the browser cache. If the browser caches the content of the old site, this is one of the problems you may encounter.
Now log in to the WordPress administrator of the new site. If you load the user tab on your site, your login details will be the same as your old site, but if you don’t load it, this will be everything you specified when you installed WordPress in the new location.
Check whether all your links are working properly, and whether widgets and plugins are working properly. If not, you can go back to the process where you need to use backlinks, or just make changes from the new site.
When you are satisfied that everything is working properly, remove the site from your multi-site installation. If you find something unsuitable, I suggest you put it on hold for about a week. In the meantime, you need to change the domain (listed below).
To delete a subsite from the network, go to Network Administrator> Site. Visit the site and click the delete link below its name.

Delete a website in a multi-site network
Hey! This is a long and somewhat complicated process, but you did it.
Migrate users from multiple WordPress sites to a single site
It is more complicated to migrate users from other sites in the network, because the users of the entire network are stored in a database table.
This means that unless your network has only a few users, and all users are sub-users, you will not be able to remove the wp_users tab from the network.
Need a hosting solution that provides you with a competitive advantage? Your atakdomain achieves incredible speed, state-of-the-art security and automatic measurement. View our plan
Instead, you need to use a plug-in to remove users from the network to the new website. The WordPress user import/export plugin is made for this and is free.
Install plugins on both sites and enable subsites on the multisite network and the new site. Now in the subsite, go to Users> User Import and Export.
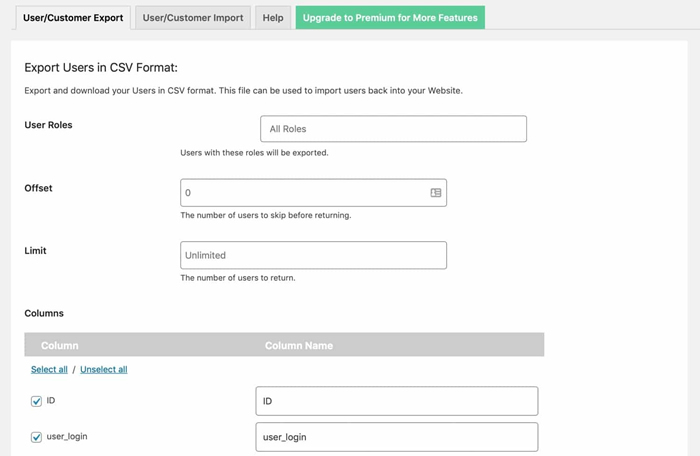
User import and export screen
Scroll down and click the "Export Users" button to download a CSV file containing all user data.
Now in the new website, go back to User> User Import and Export. Click the Users/Import Customers tab.

User import table
Click the "Choose File" button to select the CSV file you just downloaded, and then click the "File Upload and Import" button.
The plugin will upload files and delete all users from your old site. It will then take you to a screen that displays the details of the user you imported.
You have now installed all aspects of the old website from the Multisite network to the new WordPress installation. You only need to perform one step: transfer your domain name.
Migrate your domain from a multilingual network to a new single website
Whether you need to migrate your domain name will be related to how you set it up in the Multisite network.
If you use subdomains or subdomains for your subdomains, and the domains are not mapped to them, then you need to register a new domain for your unique domain and use it.
However, if you want to use the same domain name as the old site, you need to make sure that it does not appear on your old site network.
If you delete a subsite from Multisite (which you should do), the domain will no longer be used by that site. But you still need to activate it on the new website.
To do this, you need to enter your domain name using the DNS on the new website. If you use Atakdomain, please follow our instructions to enter your domain name on our host.
Then update the settings on the new website under "Settings"> "General".
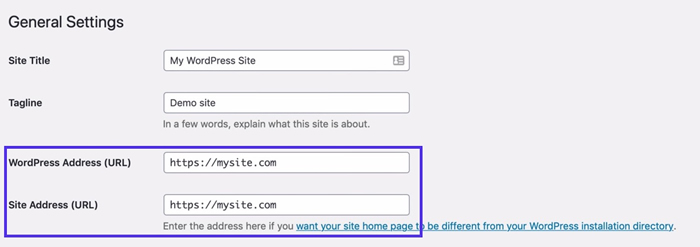
General setting screen
Add the correct domain name to the website URL and website address fields and make changes.
You are done! Your site will now run as a WordPress site.
How to turn the entire multimedia network into a website
Sometimes you don’t want to delete a single site from the WordPress Multisite network, but you want to turn the entire network into one site and never run Multisite.
This is a difficult step, but if your network contains only a few sites, or you have to delete all sites except the basic site, this may be relevant.
You can only do this with the basic site, which existed before multisite was enabled. Therefore, you can return to one of the subsites that is the only site on the network.
To do this, you can perform the following five steps:
1. Delete or move all sites in the network
2. Remove and delete unused themes and plugins on this site
3. Delete users who cannot access the basic website
4. Disable multiple WordPress sites in your WordPress settings
5. Delete the Database table that Multisite has added
Let us handle this process.
1. Delete or move all sites in the network
First, you need to delete all subsites in the network. Simply delete them from the site screen, or move each of them to your unique website or create another torpedo (although you may want to create another torpedo, it is difficult to understand why you want to do it).
Follow the steps above to migrate each subsite. After this is done and they are all working in the new location, go to Network Admin> Site.
Select all subsites, then open the "Download" menu and select "Delete". Then click the Apply button.
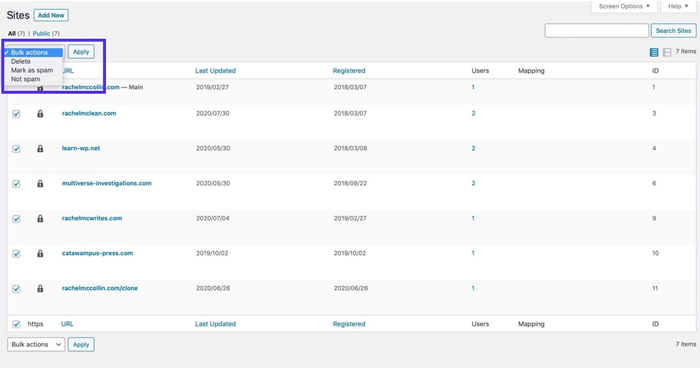
Delete all subsites
Be very careful before you do this and make sure that everything you need is backed up or relocated. There is no turning back.
Deleting sub-sites like this will delete the uploaded files for each sub-site and the database tables associated with those sites-but it will not delete all multi-site database tables, which you will do later.
You currently only have one website.
2. Remove and delete unused themes and plug-ins on this site
Now go to Network Administrator> Add. Remove unused plugins from the main site. You may need to first go to the add-ons screen to view the main site.
Repeat this for the topics and delete the topics you don't need.
3. Delete users who cannot access the basic website
Now go to Torgilok Admin> Users and delete all user accounts that access the main site.
Installing the Multisite Enhancements plug-in may help, as this will tell you which users have accounts on which site. In the example below, only super administrators can access the basic site.
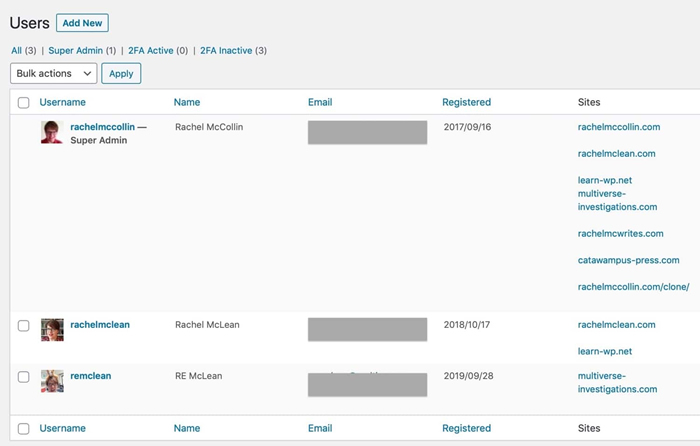
Internet users
To delete a user, select the user you want to delete, click Rent Dealer, select Select, and then click the Apply button.
Now, there will only be users with basic website access on your network.
Disable multiple WordPress sites in your WordPress settings
The next step is to disable WordPress Multisite on your network. Until then, get backlinks from your website-just in case.
Now open the wp-config.php file and find the following lines:
define( 'MULTISITE', true );
define( 'SUBDOMAIN_INSTALL', false );
$base = '/wordpress/';
define( 'DOMAIN_CURRENT_SITE', 'localhost' );
define( 'PATH_CURRENT_SITE', '/wordpress/' );
define( 'SITE_ID_CURRENT_SITE', 1 );
define( 'BLOG_ID_CURRENT_SITE', 1 );
Delete all these lines.
See the following line:
Definition ('WP_ALLOW_MULTISITE', true);
Edit reading:
Definition ('WP_ALLOW_MULTISITE', false);
Now save the wp-config.php file.
You may also need to modify the .htaccess file to restore it to a unique web code.
If you are a Atakdomain client and your multi-site network is running on a subdomain, you should see that you do not need to make this change, your site will only be changed as a single site using wp-config.php. If your network is running on a subdirectory, you will need support to make changes.
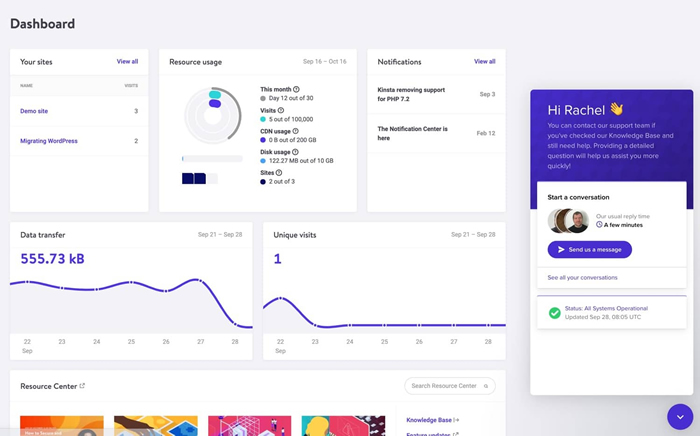
Support ticket through MyAtakdomain
If you have access to the .htaccess file, open it in a code editor and look at the line associated with Multisite. Edit with these lines:
RewriteEngine On
RewriteBase /wordpress/
RewriteRule ^index.php$ - [L]
# uploaded files
RewriteRule ^([_0-9a-zA-Z-]+/)?files/(.+) wp-includes/ms-files.php?file=$2 [L]
# add a trailing slash to /wp-admin
RewriteRule ^([_0-9a-zA-Z-]+/)?wp-admin$ $1wp-admin/ [R=301,L]
RewriteCond %{REQUEST_FILENAME} -f [OR]
RewriteCond %{REQUEST_FILENAME} -d</p>
RewriteRule ^ - [L]
RewriteRule ^([_0-9a-zA-Z-]+/)?(wp-(content|admin|includes).*) $2 [L]
RewriteRule ^([_0-9a-zA-Z-]+/)?(.*.php)$ $2 [L]
RewriteRule . index.php [L]
Save the .htaccess file.
Database tab added by Multisite
When you activate Multisite for the first time, WordPress will add additional database tables to your site.
In phpMyAdmin, look at these tables:
• wp_blogs
• wp_blog_versions
• wp_registration_log
• wp_signups
• wp_site
• wp_sitemeta
Select all of them on the Selected button: click and select Drop. Make sure you want to do this and the table will be deleted from the database.
You now have a WordPress installation site. You will need to log in again, but the basic site should now be running as a single site.
Sometimes it's a little too much.
Moving a website from a WordPress multisite platform is more complicated than migrating between individual websites, but it is impossible. It is also possible to return a multi-site torrent to a single site so that only the basic site still exists.
Follow the steps above and you will have a unique new site, not a site in a multi-site network. Questions about WordPress Multisite and unique websites? Let us know in the comments!
_______________________________________
Save time, money, and improve website performance by:
• Instant help from WordPress hosting experts, 24/7.
• Cloudflare Enterprise integration.
• A global audience reaches data centers around the world.
• Use our built-in application performance monitor for optimization.
Categories
- Domain Guide & Registration Process
- Email Services & Setup Instructions
- Step-by-Step How-To Guides
- Insights & Articles from the Tech World
- Server Management & Performance Tips
- Software Development & Coding Resources
- SSL Certificate Guide for Secure Websites
- Choosing the Best Hosting & Optimization Tips
- Key IT Terms & Their Definitions
- SQL Database Management & Queries
- WordPress Setup & Optimization Strategies


