How to Set Up Autoptimize for Your WordPress Site
Autoptimize is a free WordPress optimization plugin. In addition to HTML, CSS, and JavaScript optimization, Autoptimize also includes optimization features targeted at other aspects of modern WordPress sites.
In this post, we’ll share the best Autoptimize plugin settings to improve the performance and page speed of your WordPress site.
Why Autoptimize?
Before we dive into the best Autoptimize settings, let’s quickly go over three reasons why Autoptimize is a great optimization plugin.
- The free version of Autoptimize has a complete feature set for optimizing your WordPress site.
- Autoptimize is strictly an optimization plugin and does not do any HTML page caching. This means it is compatible with all web hosts – even ones with custom page caching configurations like Atakdomain.
- Autoptimize has over 1 million active installs in the WordPress repository and is consistently updated with new features and bug fixes.
Autoptimize JS, CSS, and HTML Settings
HTML, CSS, and JavaScript is Autoptimize’s bread and butter. As with other optimization plugins, digging into Autoptimize’s extensive feature set and settings can be a daunting task. To make things easier, we have compiled the best Autoptimize settings for improving your site’s performance.
JavaScript Options
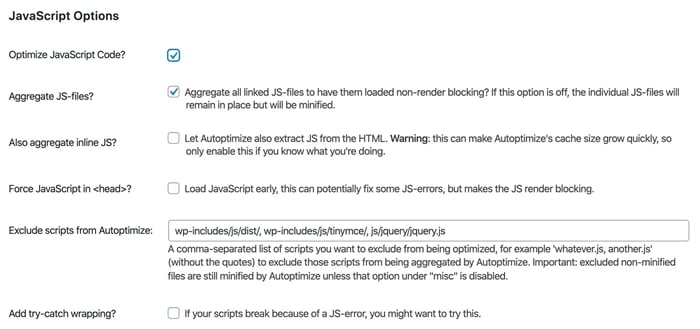
JavaScript optimization in Autoptimize.
Optimize JavaScript Code
We recommend enabling this option. When “optimize JavaScript code” is enabled, Autoptimize will minify your JavaScript files.
Aggregate JS Files
Autoptimize’s “aggregate JS files” option will combine all of your JavaScript files into a single file. In the past, combining JS and CSS files was a key step in WordPress optimization. At Atakdomain, we use >modern HTTP/2 servers that support parallel downloads and multiplexing – this means combining files is no longer as important as it used to be because HTTP/2 allows multiple files to be downloaded at the same time. With that said, aggregating CSS and JS files will still result in a speed bump for certain types of WordPress sites, so we recommend testing your page speed with this option enabled and disabled.
Also Aggregate Inline JS
The “also aggregate inline JS” option extracts inline JS in your HTML, and combines it with Autoptimize’s optimized JS file. Since this option can cause a rapid increase in Autoptimize’s cache size, we recommend keeping this option disabled unless you have a specific reason to enable it.
Force JavaScript in
In most cases, we do not recommend forcing JavaScript files to load in your site’s HTML <head> element. Forcing JS to load early can result in render-blocking elements that may slow down your page speed. If you have JavaScript files that need to be loaded in the <head> element, we recommend excluding those scripts from Autoptimize.
Exclude Scripts from Autoptimize
This option allows you to exclude specific directories and JavaScript files from aggregation. By default, Autoptimize excludes the following scripts.
- wp-includes/js/dist/
- wp-includes/js/tinymce/
- js/jquery/jquery.js
Note that adding a script to be excluded only affects aggregation by default. Excluded JavaScript files will still be minified unless “minify excluded CSS and JS files” is unchecked under “Misc Options”.
Add Try-Catch Wrapping
Enabling the “add try-catch wrapping” option will wrap your JavaScript code in try-catch blocks. This option is useful for debugging issues caused by JS minification and aggregation. If your site only works with “add try-catch wrapping” enabled, we recommend working with a developer to go through your JavaScript files to identify the one causing the issue because excessive use of try-catch blocks can reduce JS performance.
CSS Options
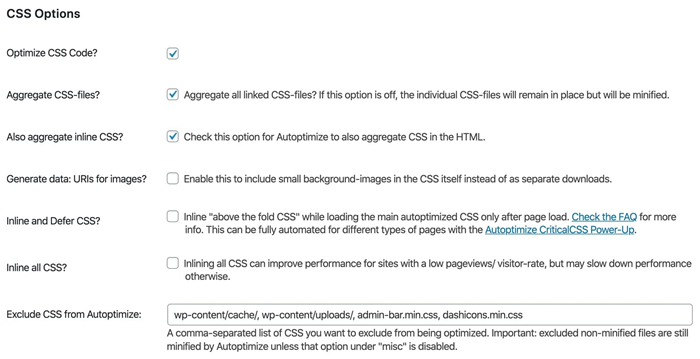
Autoptimize CSS optimization.
Optimize CSS Code
We recommend enabling this option. When “optimize CSS code” is enabled, Autoptimize will minify your CSS files.
Aggregate CSS Files
Autoptimize’s “aggregate CSS files” option will combine all of your CSS files into a single file. As we mentioned earlier, this feature may not benefit sites that support HTTP/2. We recommend A/B testing this option on your site to determine if there is any positive impact on page speed.
Also Aggregate Inline CSS
This option will move inline CSS to Autoptimize’s CSS file. While moving inline CSS to a browser-cacheable CSS file can reduce page size, we recommend leaving this option disabled in most cases.
Generate Data: URIs for Images
When this option is enabled, Autoptimize will base64-encode small background images and embed them into CSS. We recommend testing out this option to gauge the impact on your page speed. While encoding images into base64 format reduces the number of HTTP requests, base64 representations files are typically 20-30% larger than their binary counterparts.
Inline and Defer CSS
Inlining critical CSS can result in a significant speed boost for some sites. The idea here is inline styles that are required for elements that are “above the fold”. In practice, inline CSS usually targets elements like structural elements, global font families and sizes, and navigation styling.
By inlining these key elements, the larger complete CSS file can be loaded at a later time without impacting the look of the page. While it’s possible to manually extract critical styles, we recommend using a tool like this one to generate the styles as a starting point.
Generate critical CSS.
After generating the critical CSS, copy and paste it into Autoptimize settings.
Inline and defer CSS in Autoptimize.
The next step is to test your site’s frontend experience. If you notice some strange flashes of unstyled content (FOUC), you’ll likely need to identify those unstyled elements and add the corresponding styles into Autoptimize for inlining.
Autoptimize offers a “power-up” that automatically generates critical CSS for your WordPress pages. From our experience, this feature can occasionally slow down your site because it uses external API calls to generate the critical CSS. Thus, the initial critical CSS generation is dependent on the responsiveness of an external server. In most cases, the aforementioned method which doesn’t require any external API calls is a cleaner solution.
Inline all CSS
For most sites, we do not recommend inlining all CSS as it can increase page size dramatically. Furthermore, inlining all CSS makes it impossible for the web browser to cache CSS.
Exclude CSS from Autoptimize
By default, Autoptimize excludes the following directories and CSS files from aggregation. If you would like to prevent Autoptimize from aggregating any of your CSS files, you can add them to this list. Similar to JavaScript exclusion, this feature’s default behavior does not prevent CSS files from being minified – only aggregated.
- wp-content/cache/
- wp-content/uploads/
- admin-bar.min.css
- dashicons.min.css
HTML Options
Autoptimize’s HTML optimization can help reduce the size of your pages by removing whitespace.
HTML optimization in Autoptimize.
Optimize HTML Code
We recommend enabling the “optimize HTML” code feature because it reduces page size by removing unnecessary whitespace in your HTML. While this feature is compatible with most sites, removing whitespace can cause glitches on some sites. Thus, we recommend testing HTML code optimization thoroughly before using it in a production environment.
Want to know how we increased our traffic over 1000%?
Join 20,000+ others who get our weekly newsletter with insider WordPress tips!
Keep HTML Comments
Enable this feature if you would like to keep HTML comments for your optimized pages.
CDN Options
If you are using a CDN like AtakdomainCDN to accelerate static assets, you’ll need to add the CDN URL to Autoptimize. If you are using a proxy service with CDN capabilities like Cloudflare, you do not need to configure anything in Autoptimize’s CDN options.
Configure CDN settings in Autoptimize.
Cache Info
Autoptimize’s “cache info” displays important information like the location and permissions of the cache folder, as well as the total size of the cached styles and scripts. If you see “No” next to “Can we write?”, you’ll need to work with your host to fix the folder permissions.
Autoptimize cache info.
Misc Options
Autoptimize has a few miscellaneous optimization settings. If you’re having issues getting optimized CSS and JS files to load on your site, you may need to reconfigure some of the settings below.

Miscellaneous optimizations in Autoptimize.
Save Aggregated Scripts/CSS as Static Files
We recommend enabling this option to save aggregated files as static files locally. You may need to disable this if your server is not configured to handle file compression and expiry.
Minify Excluded CSS and JS Files
We recommend enabling this option to ensure all CSS and JS files are minified. However, if you notice some minification-related issues with some of your excluded CSS and JS files, you can go ahead and disable this option.
Also Optimize for Logged In Editors/Administrators
We recommend enabling this to ensure assets are optimized for logged-in editors and administrators. This is important if you are testing Autoptimize settings as a logged-in user.
Image Optimization in Autoptimize
Autoptimize features a built-in integration with ShortPixel for optimizing images. In addition to an image quality setting, Autoptimize’s integration also allows you to generate and serve WEBP versions of your images.
For Atakdomain users, we do not recommend using the image optimization feature in Autoptimize. Instead, we recommend using the full-featured plugins from ShortPixel or Imagify directly. With the full plugin, you’ll have more granular control over optimization settings including rewriting images to use the <picture> tag, which is required for WEBP support on Atakdomain.

Lazy-load images with Autoptimize.
Autoptimize also includes lazy-loading functionality for images. We recommend enabling this feature to improve page speed for image-heavy pages. When lazy-loading is enabled, Autoptimize lets you exclude certain image classes and filenames from being lazy-loaded.
The exclusion setting is useful for images like logos, social icons, and other important image elements that shouldn’t be lazy-loaded. If you’re looking for a solution that offers more control over lazy-loading, check out our guide on lazy-loading images and videos in WordPress.
Extra Optimizations in Autoptimize
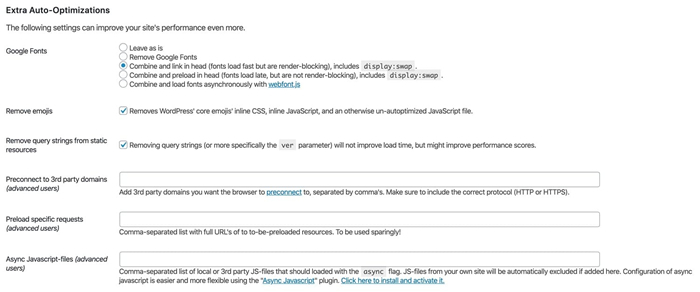
Extra optimizations in Autoptimize.
Google Fonts
Autoptimize has a few different options for optimizing Google Fonts. The best option for you will depend on how your site utilizes Google Fonts.
- Leave as is.
- Remove Google Fonts.
- Combine and link in head.
- Combine and preload in head.
- Combine and load fonts asynchronously with webfont.js.
We don’t recommend using the “leave as is” option because it offers no speed benefit.
If Google Fonts isn’t a mission-critical requirement on your site, removing them and using a system font stack instead can have a huge positive impact on your page speed.
If you would like to keep Google Fonts on your site, we recommend testing out the last three options to find out which one works best for your site.
Remove Emojis
This Autoptimize option removes CSS and JavaScript related to WordPress core emojis. We recommend enabling this option because it can help slim down your page size. Furthermore, most mainstream operating systems ship with font stacks that include emojis. Of course, there are other ways as well to disable emojis on your WordPress site.
Remove Query Strings from Static Resources
If you’d like to remove query strings (e.g. ?ver=) from static resources, you can enable this option. The removal of query strings will not impact load time, but it may help improve your site’s score in GTmetrix, Google Pagespeed, and other performance testing services.
Preconnect to 3rd Party Domains
The preconnect directive allows your browser to connect to specified domains to process DNS lookups and SSL handshake negotiations before a full HTTP request is sent.
For example, if your site has a logo image that’s served from https://site.atakdomain.cdn.com/logo.png, you can instruct Autoptimize to add a preconnect directive to handle the initial DNS and SSL connections in the <head> element before the HTTP request is made in the <body> element of your HTML.
You can use your browser’s developer tools or inspector to find important external domains to preconnect to. In the example page below, there are external requests to the following domains.
- https://cdn.brianli.com
- https://www.google-analytics.com
- https://www.googletagmanager.com
These three domains can be added to Autoptimize’s preconnect list.
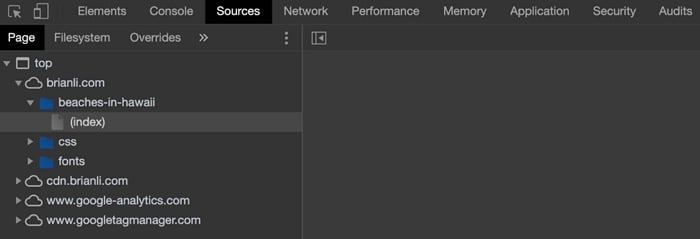
Find external assets with developer tools.
For performance reasons, we recommend adding no more than six domains to Autoptimize’s preconnect list because specifying preconnect directives for too many domains can result in a performance hit.
Preload Specific Requests
Preload directives instruct your web browser to download an asset as soon as possible. This directive is useful for downloading assets that are needed very early in the page load process. In practice, preloading is often used to speed up load times for custom fonts by loading them before they are requested in the page’s CSS.
We recommend consulting with a developer regarding which assets, if any, to preload on your WordPress site. As with many other performance-related tweaks, preloading too many assets can cause your site to load slower.
Async JavaScript Files
Autoptimize’s “async JavaScript files” feature allows you to specify certain external JavaScript files to load asynchronously via the async HTML flag. While loading JS files asynchronously can improve page speed, we recommend doing adequate testing to make sure that no site functionality is affected.
Summary
If you know how to tweak its settings, the Autoptimize plugin is a solid option for WordPress users looking to boost site performance.
With basic features like HTML and CSS optimization and more advanced ones, like CDN integration and the ability to specify preconnect and preload directives, Autoptimize has everything you need to optimize your WordPress site’s frontend performance.
If you’re interested in learning more about WordPress optimization and how to optimize your site’s backend, be sure to check out our comprehensive WordPress performance guide.
Save time, costs and maximize site performance with:
- Instant help from WordPress hosting experts, 24/7.
- Cloudflare Enterprise integration.
- Global audience reach with 28 data centers worldwide.
- Optimization with our built-in Application Performance Monitoring.
Categories
- Domain Guide & Registration Process
- Email Services & Setup Instructions
- Step-by-Step How-To Guides
- Insights & Articles from the Tech World
- Server Management & Performance Tips
- Software Development & Coding Resources
- SSL Certificate Guide for Secure Websites
- Choosing the Best Hosting & Optimization Tips
- Key IT Terms & Their Definitions
- SQL Database Management & Queries
- WordPress Setup & Optimization Strategies
