

How to A/B Test with Google Optimize in WordPress for Free
It doesn’t matter what type of WordPress site you have, whether it’s an ecommerce store or affiliate marketing blog, it’s vital that you never stop A/B testing! Data-driven decisions are what can help propel your website or business forward and get you ahead of the competition. But let’s be honest, A/B testing isn’t always easy. Or perhaps you’ve just been putting it off. Well, today hopefully we can change that!
Below we’ll dive into how to A/B test with Google Optimize in WordPress. It doesn’t matter what type of site you have, this will work across the board. And best of all, it’s free.
What is A/B Testing?
A/B testing, sometimes also referred to as split testing, is a way to compare elements on a page (or any type of data) against each other to determine which performs better in terms of page views, time on page, conversions, bounce rate, etc. A few examples include:
- Testing different headlines.
- Trying out new landing page content or page layouts.
- Experimenting with different color CTA buttons.
- Showing something completely different such as a CTA in a widget vs a contact lead form. You can track in Google Analytics sales down the funnel to see which leads to more sales.
There are different forms of A/B testing, such as multivariate testing, but the most common method is simply sending 50% of your traffic to page A and 50% of your traffic to page B. Also known as a split test.
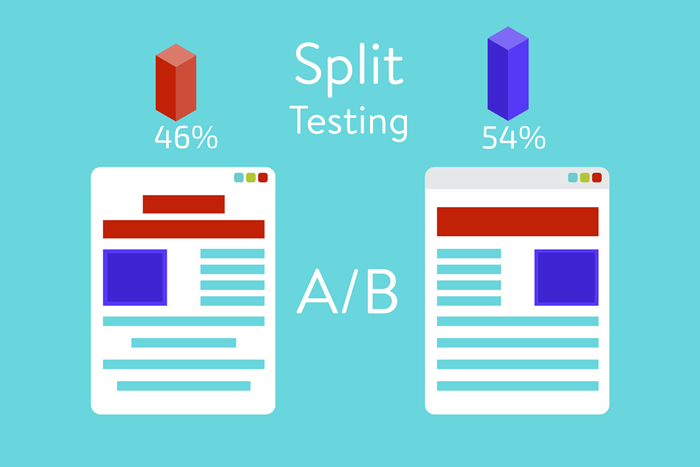
A/B split testing
The idea is to start with simple tests, such as changing the CTA text or button color, finding the winner, and the replicating this over and over with new winners. As you do this you should start to see better results for whatever goal you are after.
It’s also very important to determine if your website has enough traffic to even start A/B testing due to sample sizes and time. Stephen Watts has a great article which touches on some of these finer points, including why you should be replicating your marketing tests.
Google Optimize
There are a lot of different tools to choose from when it comes to A/B testing. We cover a lot of them in our post on the best A/B testing tools.
However, if you have a lot of traffic, many of them could easily run you hundreds or even thousands of dollars a month. Better to spend that budget on high-quality hosting. Many A/B testing tools also have a lot of features you will probably never use.
While a great tool can definitely pay off in terms of return, it can be advantageous to start with something free to start learning how A/B testing works and seeing which goals are attainable for your business.
Google Optimize in our opinion is an excellent tool to start with right off the bat, especially because it’s free. While it doesn’t have a WordPress plugin or direct integration, it’s still quite easy to use once you get the hang of it. Another bonus is that its tie-in with Google Analytics, a tool most of you are probably already using, is even far superior them some other solutions. You can hook it up to a Google Analytics goal with a single click.

Google Optimize
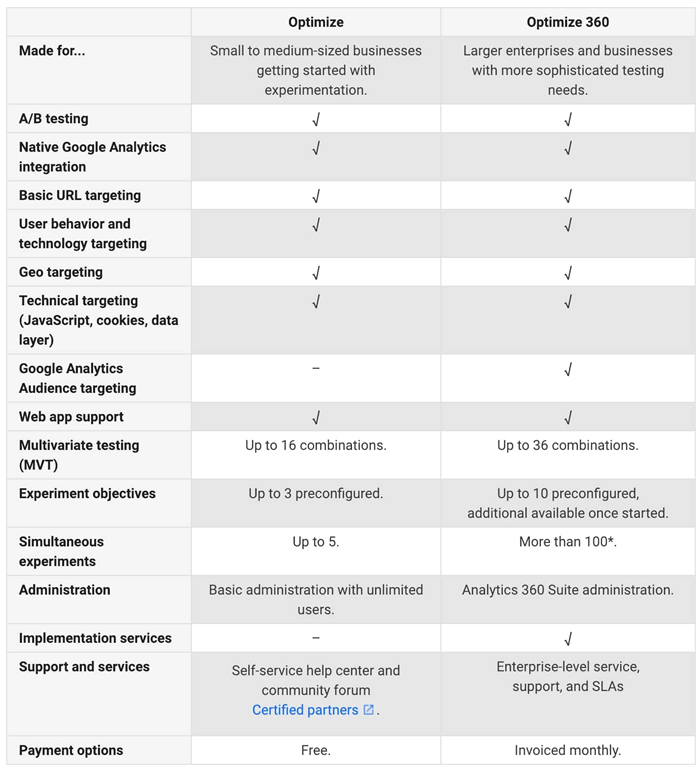
They do have a premium version (Optimize 360), but you can run up to 5 simultaneous experiments for free. For many of you this should be more than enough as you don’t want to run too many A/B tests at the same time, otherwise, it might skew the quality of your data. We have used the free version of Optimize at Atakdomain and it works great!
If you are curious, here is a comparison below of the free version (Optimize) vs the premium version (Optimize 360).
Google Optimize vs Optimize 360 (Image source: Google)
How to Set Up Google Optimize in WordPress
Follow the steps below to set up a free Google Optimize account and get it configured on your WordPress site.
Step 1
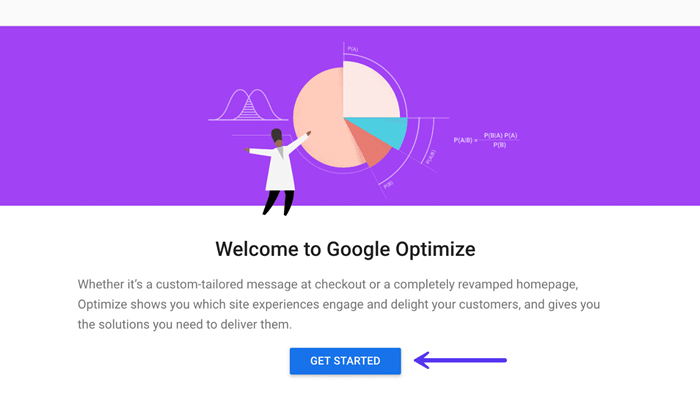
The first thing to do is head over to Google Optimize and sign up for a free account by clicking on the “Get Started” button.
Important: You will want to use your Gmail or Google Workspace email address that is already attached to your Google Analytics account.
Get started with Google Optimize
Then follow the next steps with some optional questions about data permissions and sharing.
Step 2
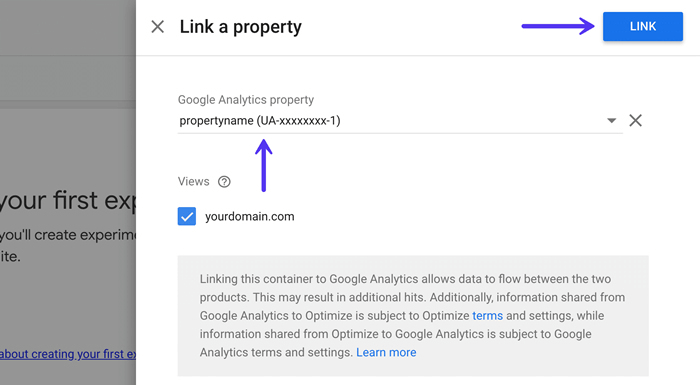
Next, you will need to link your Google Analytics property. On the right-hand side click on “Link Property.”
Google Optimize – Link Google Analytics Property
Step 3
You should then see your Google Analytics property. If you have multiple properties attached to your Gmail you will need to choose the one you want to use with Google Optimize. Then click on “Link.”

Link a property in Google Optimize
Step 4
Next, click on “Get Snippet.”
Google Optimize get snippet
Step 5
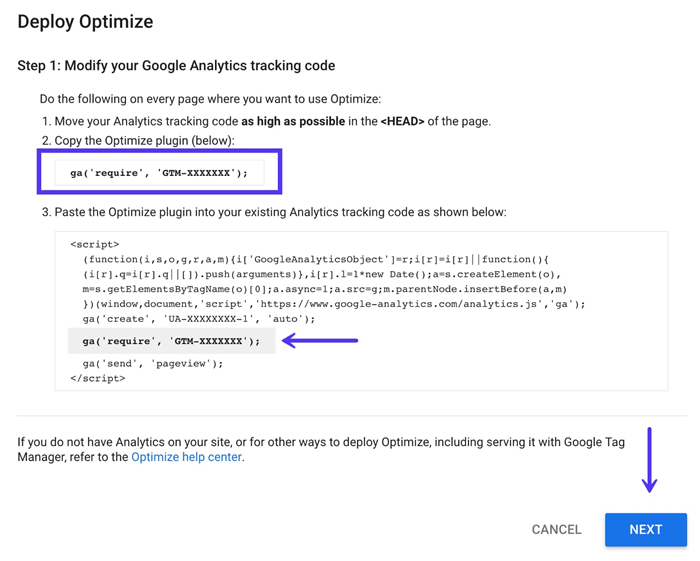
Now it’s time to modify your Google Analytics code with your Google Optimize container ID. There are a few important things to mention here:
- If you currently have Google Analytics installed on your site, it must be in the header of your site, before the </head> tag. Usually placing it in the footer is OK, but in this case, you will run into a noticeable white flash on page load if you aren’t running the script in the header. This is because the script needs to fire right away as the DOM loads. If you’re using a WordPress plugin most have an option to choose header or footer placement for the script.
- The Optimize snippet will look something like this: ga('require', 'GTM-XXXXXXX'); which contains your Optimize container ID. All you need to do is modify your current Google Analytics script to include this, not add the entire script again.

Deploy Optimize code
If you have manually installed your Google Analytics tracking script, then all you need to do is simply add it, like in the example they provide. However, if you are currently using a Google Analytics WordPress plugin, you might need to change a few things.
You should first check to see if your Google Analytics WordPress plugin already supports Google Optimize or adding custom code. Here are a couple WordPress plugins which already support Google Optimize or allow you to add the code in their plugin settings:
- Google Analytics Dashboard for WP: Under integration in the plugin settings it has an option to add your Optimize container ID.
- GA Google Analytics: Has an option in the settings of the plugin to add the Optimize code.
Note: If you’re using Google Tag Manager to deploy Google Analytics, you can still install Optimizer, but it might have additional latency and even Google doesn’t recommend this. Due to how the script works in terms of performance, they recommend deploying Optimize directly on the page (which is what most WordPress plugins do).
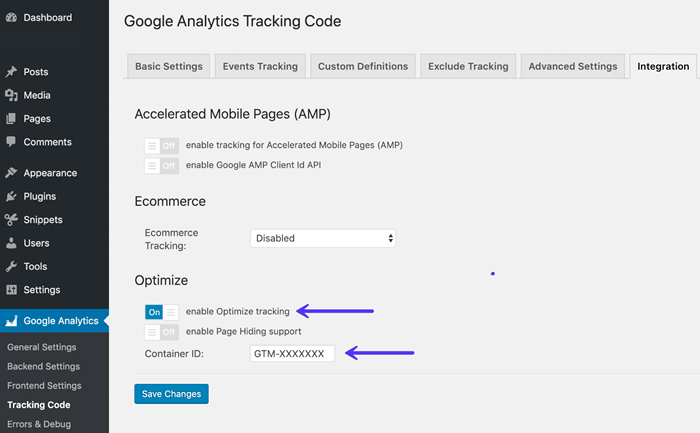
Below is an example using the Google Analytics Dashboard for WP plugin. Under the Integration tab, you can “enable Optimize tracking” and enter your Container ID.
Enable Google Optimize in Analytics plugin
After you have the code in place, click on “Next” back on the Google Optimize wizard.
Step 6
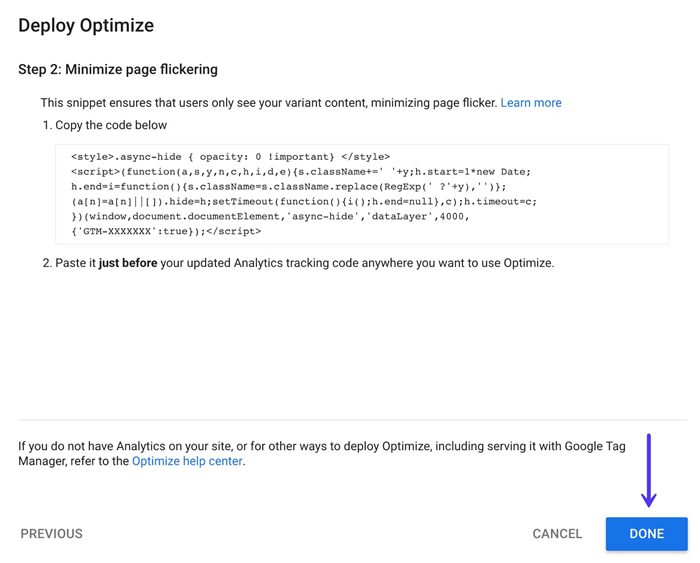
When Google Optimize first launched it had some performance issues and they created a page-hiding snippet to reduce the page flicker on page load. Adding the page-hiding snippet requires adding additional code right before your Analytics tracking code.
However, we have found recently that this is no longer always necessary. If your site is already fairly fast, you shouldn’t have any issues. We no longer use the page-hiding snippet and run tests all the time.
However, as every site is different, if you run into issues, you might need to further modify your Analytics script with the page-hiding snippet code. You can also modify the async-hide time, which is by default set to 4000 ms. Some plugins, such as the one above also have easy toggles to enable page hiding support.
Minimize page flickering
Click “Done” and your WordPress site should be ready to go.
How to Run an A/B Test with Google Optimize
Now for the fun part, creating your very first A/B test in Google Optimize.
Step 1
On the Google Optimize dashboard click on “Let’s Go” to create a new A/B test, or what they call an experiment.
Want to know how we increased our traffic over 1000%?
Join 20,000+ others who get our weekly newsletter with insider WordPress tips!
Create Experience A/B test in Google Optimize
Step 2
In this following example, we are going to do a simple CTA button color change A/B test so you can easily see how it works. Remember that basically any HTML or CSS element on your WordPress site can be changed in Google Optimize.
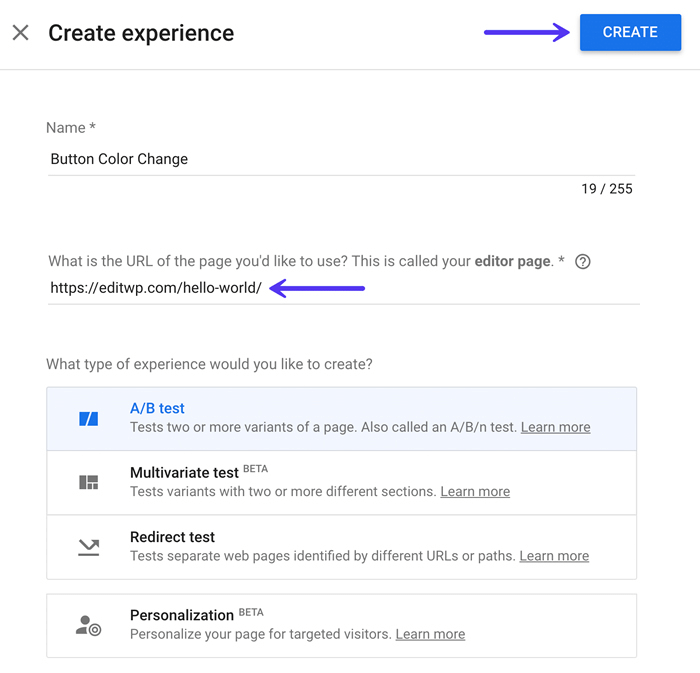
So we choose a name for our test, and input the URL in which we want to edit the code for the experience. In this example, we are wanting to change the button color on a CTA button to see which one drives more traffic to our contact us page. We also choose A/B test for the type of experience. Then click “Create.”

Google Optimize create A/B test
As you can see, Google Optimize also supports other types of experiments besides A/B tests which you might want to explore:
- Multivariate test: Testing variants with two or more different sections.
- Redirect test: Tests separate web pages identified by different URLs or paths.
- Personalization: Personalize your page for targeted visitors.
Step 3
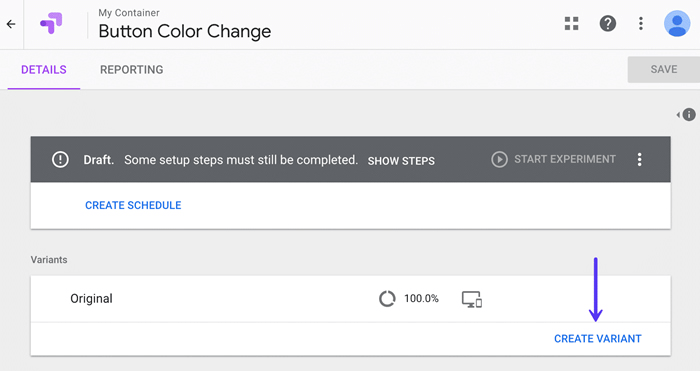
By default, Google Optimize will use the editor page you chose above for the experiment as the original variant. You will then need to create a second variant. Click on “Create Variant.”
Google Optimize create a variant
Step 4
Give your variant a name, something you can easily recognize later. Since we are testing a different button color, we name ours Red Button. Then click “Done.”
Google Optimize name variant
Step 5
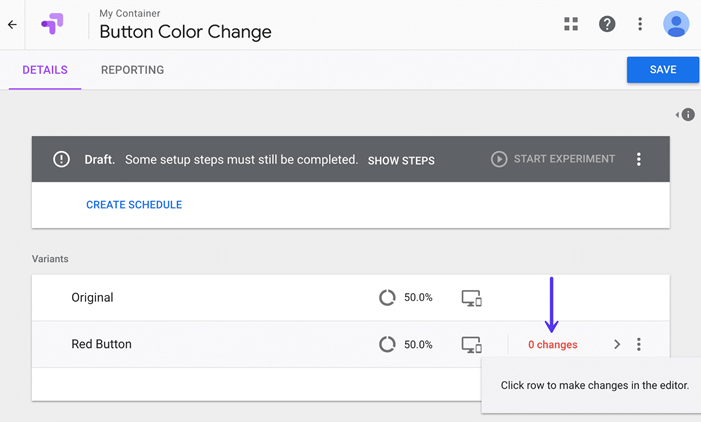
You will then need to change your variant, as by default it simply creates a copy of your original. Click on the “0 changes” in red.

Google Optimize change variant
Step 6
You will probably see a warning about using a Google Chrome extension. For the best editing and preview capabilities, you’ll want to install the free Google Chrome Optimize extension.
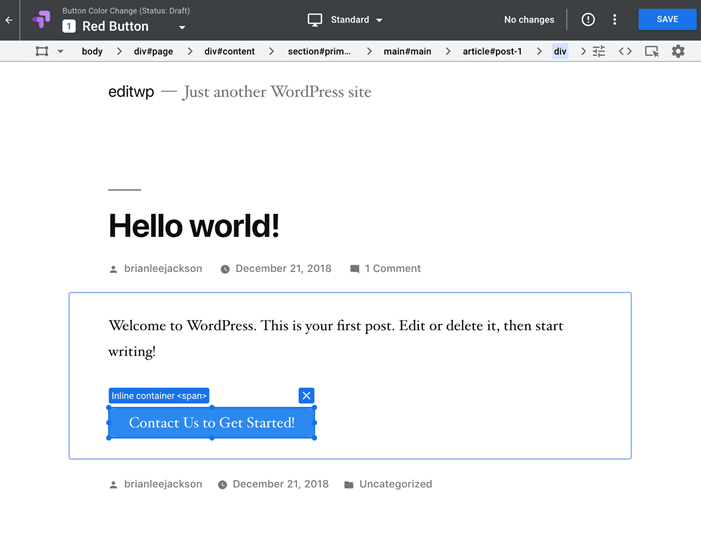
You will then see the Google Optimize editor. It’s pretty powerful! You can literally change anything on a page.
Google Optimize Editor
In our example, we are testing the results of clicks into our contact us page with two different colors of a button, blue and red. If you’re curious, we are simply using the Shortcodes Ultimate plugin for the button.
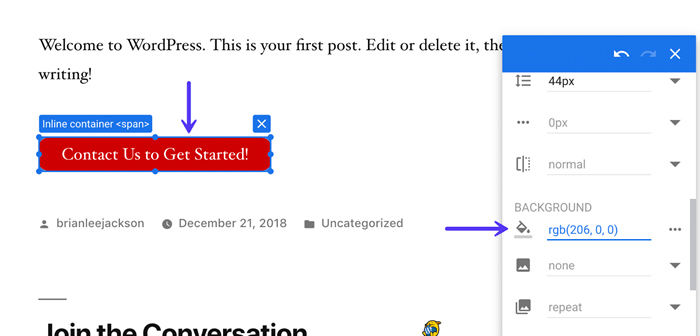
So first we want to change the color of the button. To do so you can simply click on any element, in this case, the button, and edit the CSS properties for it. They even have a color picker. You could edit the CSS or HTML directly if you prefer.
Change button color in Google Optimize
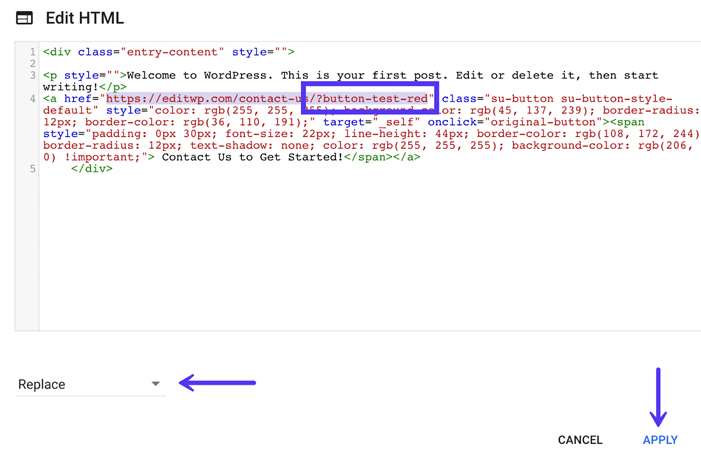
The other thing we change is the URL of the button.
- Original button is linked to https://editwp.com/contact-us/?button-test-blue.
- Variation button points to https://editwp.com/contact-us/?button-test-red.
Change button URL
Why did we do this? In Google Analytics you can then at any time browse to see how many page views were registered based on which button type. You should never use UTM parameters on your internal site, but appending something like we did above to the URL is fine. This simply gives you extra data you can browse at any time.
Once your done editing you can click “Save Changes” and “Done” in the top right. You can then click on “Web Preview” to see how it looks.
Google Optimize web preview
Below is how our test is set up. Remember, everything was changed using Google Optimize editor, not in WordPress.
A/B Original Variant
In our original variant, we have a blue button which 50% of the traffic will go to. The button link points to our contact form: https://editwp.com/contact-us/?button-test-blu.
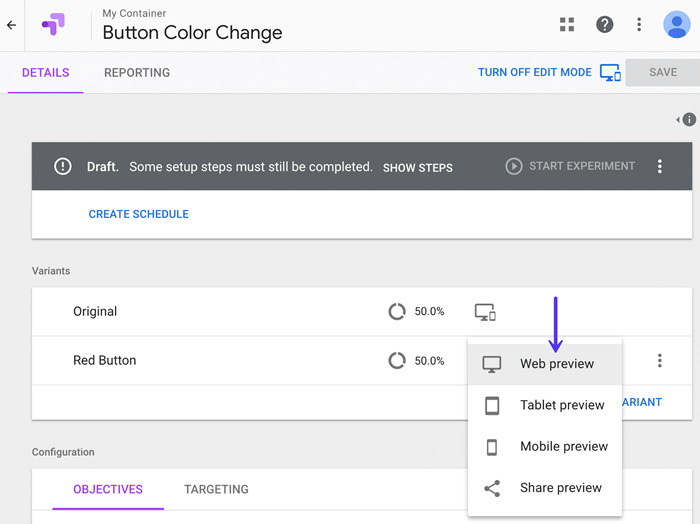
A/B test original variant
A/B Red Button Variant
In our other variant, we have a red button which 50% of the traffic will go to. The button link points to our contact form: https://editwp.com/contact-us/?button-test-red.

A/B test variant 1
Step 7
The next step is to add an objective. This is the goal or what you want to test. By default the targeting is set to 50% traffic split, so you can leave that as is. You will want to give your objective a short description so you can easily see why you added it later. Remember sometimes you might run tests for months, so make sure to add something that you can recognize at a later date. Then click on “Add Experiment Objective.”

Google Optimize experiment objective
Step 8
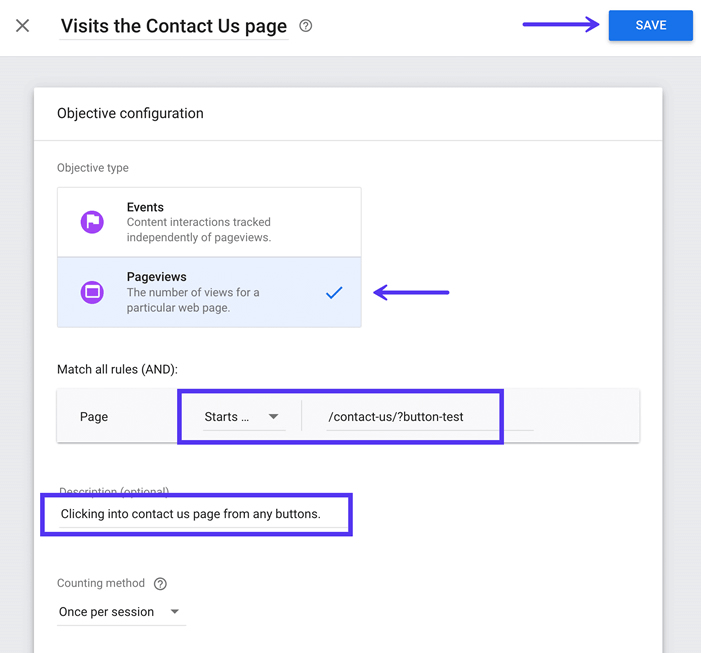
If you are already using goals and events in Google Analytics, or ecommerce tracking, then you will see them listed here. This is one of the really cool things about the direct Google Analytics integration with Optimize. Most of you probably already have conversion goals, contact form goals, etc. configured which you can easily tie into your experiment. But for this example, we are going to create a custom one.
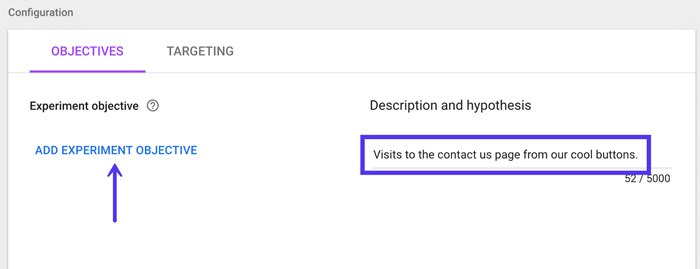
Google Optimize custom objective
Step 9
We use pageviews as the objective type and choose anything starting with our contact us page: /contact-us/button-test.

Custom objective in Google Optimize
If you have ecommerce tracking set up in Google Analytics, you can also add additional objectives for things like transactions and revenue. This is where it becomes really powerful! For example, you could then see how much revenue a certain color button generated. From the click, all the way down to the sale.
Google Optimize objectives – ecommerce
Step 10
And last but not least, once you have everything saved, you then can click on “Start Experiment.” It will then immediately start split testing the traffic on the location you specified in the experiment. You can also easily set up site-wide experiments with the targeting options.
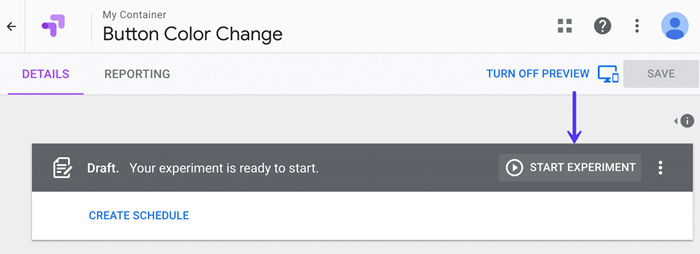
Google Optimize start experiment
You can then sit back and let Google Optimize do its thing. Typically this will take a week or two. It will automatically analyze the winner for you. You can then see which variant produced the best results. Here is an example of a report below.
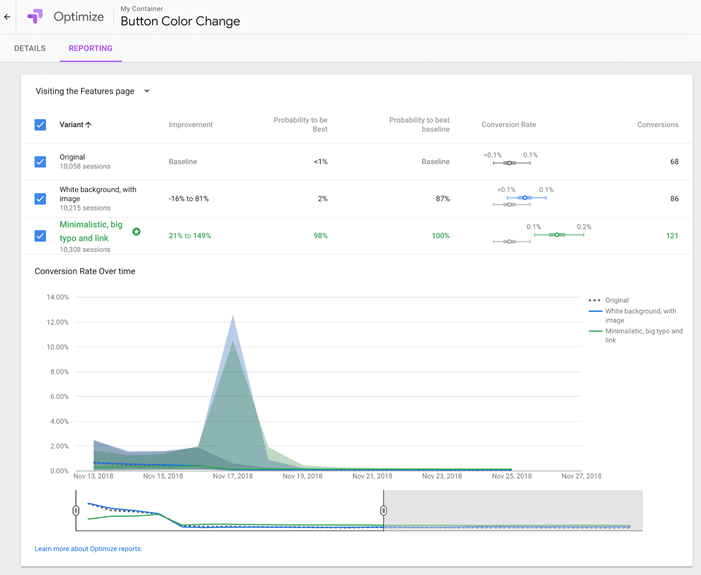
Google Optimize reporting
Summary
When it comes to marketing, the fewer assumptions the better. You are bound to find winners that you originally thought would perform worst and vice versa.
For a free tool, Google Optimize has a lot of functionality! You can change buttons, widgets, pretty much anything you can think of. Then easily monitor the results to see which one performs better. Track page views, transaction data, and even revenue generated from a single button color change. The more you play with it the more you realize just why you should never stop A/B testing. Find the winner, then test again.
Have you tried Google Optimize on your WordPress site yet? If so, we would love to hear your thoughts below in the comments.
Save time, costs and maximize site performance with:
- Instant help from WordPress hosting experts, 24/7.
- Cloudflare Enterprise integration.
- Global audience reach with 29 data centers worldwide.
- Optimization with our built-in Application Performance Monitoring.
Categories
- Domain Guide & Registration Process
- Email Services & Setup Instructions
- Step-by-Step How-To Guides
- Insights & Articles from the Tech World
- Server Management & Performance Tips
- Software Development & Coding Resources
- SSL Certificate Guide for Secure Websites
- Choosing the Best Hosting & Optimization Tips
- Key IT Terms & Their Definitions
- SQL Database Management & Queries
- WordPress Setup & Optimization Strategies


